Looking to transform your space into a sanctuary of organization without breaking the bank? You’re not alone. Many people crave a tidy, stylish home but worry about the cost of home decor and storage solutions. The good news is that you can elevate the look of your space and keep it organized on a budget. That’s why I created this post — to inspire you with affordable DIY organization ideas that not only save money but also look great.
If you’re someone who loves home decor but finds it challenging to manage clutter, this guide is perfect for you. Whether you live in a cozy apartment or a busy family home, these ideas cater to small spaces and tight budgets. You’ll discover that with a little creativity and some simple materials, you can create stylish storage solutions that enhance your home’s aesthetics.
In this post, you’ll find 18 DIY organization ideas that are unique, functional, and easy to implement. From repurposed wooden crates to chic under-bed storage, each project is designed to help you reclaim your space while keeping your style intact. Let’s dive in and turn your clutter into a masterpiece!
Key Takeaways
– Discover 18 budget-friendly DIY organization ideas that enhance both style and functionality in small spaces.
– Learn how to repurpose everyday items into stylish storage solutions, saving money while transforming your decor.
– Find practical home organization tips that help you maximize space without sacrificing aesthetics.
– Enjoy step-by-step guidance on creative home improvement projects that are easy to implement and affordable.
– Embrace the art of labeling and vertical storage to keep your belongings accessible and your space neat.
1. Repurposed Wooden Crates for Stylish Shelving

Wooden crates are not just for carrying produce; they can be transformed into stunning shelving units! By stacking and securing these crates, you create a visually appealing display that adds warmth and character to your space. Sanding down the edges prevents splinters, and you can either keep their natural finish or paint them to fit your decor theme, such as a soft white or vibrant color. Imagine displaying your favorite books, plants, or craft supplies in a unique way that draws the eye and sparks conversation.
To make the most of this stylish storage solution, consider positioning the crates vertically against a wall for a modern look or horizontally on a table for a charming storage option. You can even mix and match different crate sizes for added texture and visual interest.
Here’s how to dive into this project:
– Gather wooden crates from local thrift stores or farmers’ markets.
– Sand and paint or stain them as desired.
– Stack them creatively, using brackets for safety.
– Fill with decorative items, books, or plants for a cohesive display.
This project not only serves a functional purpose but also showcases your creativity, making your space feel more personalized and inviting.
Repurposed Wooden Crates for Stylish Shelving
Editor’s Choice


2. Magnetic Spice Jars for the Kitchen

Elevate your kitchen’s organization game with magnetic spice jars! This clever idea not only conserves counter space but also enhances the sleek, organized look of your cooking area. With just a few small glass jars, magnets, and a metal sheet, you can create a functional and aesthetically pleasing spice rack that keeps your favorite flavors at hand.
Label each jar to easily identify your spices, then attach the magnets to the lids before sticking them onto the metal sheet mounted on your wall or inside a cabinet door. This keeps your spices visible and accessible while freeing up valuable drawer space for other essentials.
Here’s how to get started:
– Gather small glass jars and strong magnets.
– Fill jars with your favorite spices, ensuring uniform sizing.
– Securely attach magnets to the lids.
– Mount a metal sheet on the wall or behind a cabinet door.
– Organize and display your spices neatly for easy access.
This project not only streamlines your cooking process but also adds a modern touch to your kitchen decor!
Magnetic Spice Jars for the Kitchen
Editor’s Choice


3. Stylish Under-Bed Storage

If you’re looking to maximize your space, don’t overlook the area beneath your bed! This hidden gem is ideal for tucking away seasonal clothes or extra linens. By using shallow bins or fabric storage bags, you can keep everything organized and easily accessible while making the most of your sleeping area.
Choose storage solutions that match your decor style—whether you prefer sleek plastic or chic, soft fabric. You can even customize the look by painting old crates to fit your bedroom’s aesthetic.
To organize effectively:
– Measure the space under your bed for proper bin sizing.
– Use clear bins for easy visibility or decorative bags for a stylish appearance.
– Label each storage container according to its contents for quick access.
– Regularly rotate seasonal items to keep everything fresh.
This under-bed storage solution combines practicality with style, ensuring your space remains beautiful and functional!
4. Pegboard Wall for Tools and Crafts

Revamp your garage or craft space with a pegboard wall! This innovative and versatile solution allows you to customize how you store tools, art supplies, or kitchen utensils. You can paint the pegboard in vibrant colors that match your decor or leave it in its natural state for a rustic touch.
Install this board above a workbench or in a pantry, and attach various hooks and shelves to keep your items secure and easily accessible. It’s a fantastic way to maintain visibility and organization, making it a favorite among DIY enthusiasts!
To set up your pegboard:
– Choose a suitable wall space and measure for the right size pegboard.
– Securely mount the pegboard to the wall.
– Add hooks, baskets, or small shelves for organization.
– Arrange tools or supplies based on how often you use them.
This project not only declutters your space but also showcases your creativity, making it a functional yet stylish feature in any room!
Difficulty Rating & Requirements
Overall Difficulty Rating: Medium
The DIY organization ideas presented in this blog post are rated as medium difficulty. These projects are suitable for anyone with basic crafting skills and a willingness to learn. While some tasks may require more tools and techniques than others, the overall projects can be tackled by most DIY enthusiasts, regardless of experience.
Time Estimate:
⏱ Estimated time: 1-3 hours per project
Most projects range in time based on complexity. For example, simple tasks like labeling may only take 30 minutes, while building floating shelves may require several hours, including measuring, cutting, and assembly. Allow ample time for drying if you’re applying paint or adhesive.
Skill Requirements:
– Required skills: Basic woodworking, measuring, painting, and organizational skills
– Beginner-friendly: Yes, with explanation
If you are new to DIY, many of these projects can teach you valuable skills such as measuring accurately and using tools safely. A few tasks, like working with tools for building shelves, may require guidance or practice. Other skills, like labeling or organizing small items, are immediately accessible to everyone.
Tools & Materials Needed:
🧰 Essential items checklist:
– Measuring tape (Required)
– Hammer or screwdriver (Required)
– Paint or stain (Optional)
– Hooks or storage containers (Required)
– Sandpaper (Optional, for smoothing surfaces)
– Labels or a label maker (Required)
– Paintbrush (Optional)
– Pegboard (Optional for certain projects)
These items cover a wide range of projects, but some specific tasks might require their unique materials. Always check the project guide for any additional needs.
Step-by-Step Overview:
1. Planning (30 minutes): Decide which organization ideas you want to tackle. Create a list of materials needed for each project and gather everything before starting.
2. Preparation (1 hour): Clear the area where you’ll be working. For projects involving paint or assembly, set up a clean workspace to avoid mess. Measure areas where you plan to implement your DIY solutions.
3. Execution (1-2 hours): Start building or assembling your projects based on instructions provided. Take your time, especially if using tools for the first time. Safety is key!
4. Finishing Touches (30 minutes): Add any labels, paint, or decorative touches to ensure your organization solution looks stylish and cohesive. This also includes cleaning up your workspace once finished.
5. Evaluation (15 minutes): Step back and assess your work. Ensure everything is functional and visually appealing. Make adjustments if necessary, like rearranging items or adding more labels.
Cost Comparison:
Professional vs DIY: Hiring a professional organizer can cost anywhere from $50 to $150 per hour, depending on location and expertise. In contrast, most DIY projects can be completed for $20 to $100, depending on materials used. If you’re looking to save money and enjoy a hands-on approach, these DIY organization ideas are a fantastic option. However, if you’re short on time or uncomfortable with tools, hiring a pro might be worth considering.
5. Hanging Closet Organizers

Maximize your closet potential with hanging organizers! These clever storage solutions can accommodate shoes, accessories, or folded clothes, ensuring you can quickly find what you need. Available in various styles and materials, you can easily select one that aligns with your aesthetic.
Hang your organizer over a door or on a closet rod, keeping everything visible and accessible while reducing clutter. This gives your closet a neat and tidy appearance, transforming it into a well-organized space.
Here’s how to implement it:
– Measure your closet space to choose the right size organizer.
– Select a hanging organizer that meets your storage needs.
– Fill it with shoes, belts, or other loose items.
– Regularly declutter to maintain functionality.
This solution not only provides storage but also showcases your fashion sense, adding style to your space!
6. Mason Jar Organizers for Small Items

Mason jars are no longer just for canning! They have become trendy organizers for an array of items, from craft supplies to office tools. You can easily mount them on a wooden board or place them on a shelf to keep your essentials visible and stylishly arranged.
Available in various sizes, these jars allow you to customize your storage solutions based on your needs. Make sure to label each jar for quick identification!
Here’s how to create your own mason jar organizers:
– Gather assorted mason jars and a wooden board.
– Securely attach the jars to the board with strong adhesive.
– Fill jars with items to organize.
– Label each jar for easy access.
This project adds rustic charm to your decor while ensuring every item has its place!
Mason Jar Organizers for Small Items
Editor’s Choice


![Wide Mouth Mason Jars 16 oz with Lids [6 Pack], Canning Jars with Metal ...](https://m.media-amazon.com/images/I/815tipUxlyL._AC_UL320_.jpg "18 DIY Organization Ideas on a Budget That Look Good 31")


7. Vintage Suitcases for Storage and Decor

Breathe new life into vintage suitcases by using them as unique storage solutions! They serve as decorative pieces perfect for holding blankets, books, or seasonal items while adding a retro flair to your decor.
Stack them in a corner or use them as a side table for an eclectic touch. Ensure they are clean and in good condition, and consider applying a coat of varnish to enhance their charm.
To begin:
– Source vintage suitcases from thrift stores or yard sales.
– Clean and restore them as needed.
– Stack or creatively position them around your home.
– Organize items within for easy access.
This project combines functionality with style, making your home feel more personalized and inviting!
Vintage Suitcases for Storage and Decor
Editor’s Choice


8. Cork Board as a Multifunctional Organizer

A corkboard is a simple yet versatile way to stay organized! Use it in your kitchen, home office, or kid’s room to display reminders, inspiration, or even artwork. Customize it with paint or fabric to match your decor style, turning a mundane item into a beautiful decor piece.
Pin important notes, photos, or schedules to keep everything visible, encouraging a clutter-free environment while showcasing what matters most to you.
Here’s how to create a useful corkboard:
– Choose a corkboard and personalize it with paint or fabric.
– Secure it to a wall where you need organization.
– Use colorful pushpins to display items attractively.
– Regularly update it to keep your space fresh.
This simple project significantly enhances both functionality and aesthetics, adding personality to your walls!
Cork Board as a Multifunctional Organizer
Editor’s Choice


9. DIY File Organizer with Cardboard

Transform a simple cardboard box into a chic file organizer! This budget-friendly DIY project allows you to declutter your workspace without breaking the bank. Simply cut and decorate the box to suit your style, and you’ll have a stylish solution to keep documents in order.
Use wrapping paper, fabric, or paint to personalize your organizer, adding a decorative touch while ensuring you can quickly find what you need.
To create your own:
– Gather a sturdy cardboard box and cut it to your desired height.
– Cover it with your choice of decorative material.
– Add dividers or smaller boxes for organizing files.
– Label each section for easy access.
This project helps maintain a tidy space while showcasing your personal style, making it both functional and aesthetically pleasing!
10. Floating Shelves for Chic Storage

Floating shelves offer a fantastic way to display and organize your favorite items without occupying valuable floor space. They add a modern touch while providing functionality. You can create a gallery wall with books, plants, and decorative pieces that reflect your personality.
You can easily construct these shelves with simple wood planks or purchase pre-made options. The key is to find the right placement to optimize your space for both style and utility.
Here’s how to achieve it:
– Choose the location for your shelves.
– Measure and mark spots for level placement.
– Secure brackets to the wall and attach shelves.
– Arrange items thoughtfully for balance.
Floating shelves are ideal for showcasing your personality while maintaining an organized, stylish environment!
11. Tension Rods for Under-Sink Organization

Tension rods may often go unnoticed, but they can revolutionize under-sink organization! Use them to hang cleaning supplies or spray bottles, maximizing that often cramped space. This smart solution keeps everything upright and accessible while freeing up shelf space for other essentials.
Simply adjust the tension rod to fit your space and hang your items neatly.
To set this up:
– Measure the area under your sink to find the right tension rod size.
– Install the rod securely between cabinet walls.
– Hang spray bottles or cloths for convenient access.
– Use the shelf above for additional items.
This approach enhances practicality while giving your under-sink area a neat, organized appearance, making cleaning tasks a breeze!
12. Upcycled Bottles for Bathroom Storage

Give old bottles a new purpose as chic bathroom storage solutions! Whether for cotton balls, swabs, or small toiletries, upcycled bottles can add style and sustainability to your space. Clean the bottles thoroughly and add labels to keep everything organized, creating a personalized touch.
To get started:
– Gather various bottles (glass or plastic) and ensure they are clean.
– Add labels for easy identification of contents.
– Arrange them on a shelf or vanity for quick access.
– Decorate the bottles with paint or twine for extra flair.
This project not only embraces creativity but also promotes eco-friendliness, ensuring your bathroom remains organized and stylish!
13. Drawer Organizers from Cardboard

Say goodbye to the dreaded junk drawer with DIY cardboard organizers! This easy and cost-effective solution will help you keep your drawers tidy. You can customize the size and shape to fit any drawer, ensuring every item has a designated spot.
Simply repurpose old cardboard to create dividers that separate items like utensils, office supplies, or craft materials. This way, everything stays in its place, making it easy to find what you need.
To create your own:
– Gather cardboard from boxes or packaging.
– Measure your drawer and cut the cardboard into desired shapes.
– Assemble the dividers inside the drawer for organization.
– Regularly declutter to keep your system functioning smoothly.
This project saves you time while promoting a stress-free environment at home!
14. Hooks for Entryway Organization

Create a welcoming entrance with hooks for coats, bags, and accessories! This budget-friendly organization idea is perfect for small spaces. You can easily install a row of hooks on a wooden board or directly onto the wall, keeping everything organized.
Select hooks that complement your decor style, from sleek metal to rustic wood, ensuring your entryway is both functional and stylish.
To implement:
– Choose a location near your door for hooks.
– Install a wooden board or directly mount hooks on the wall.
– Arrange hooks based on how frequently items are used.
– Use a small basket below for shoes or miscellaneous items.
This simple addition elevates your entryway style while keeping clutter at bay!
Fun fact: 5 hooks on a wooden board can organize a family’s coats, bags, and accessories in under 10 minutes. This budget-friendly diy organization ideas approach keeps entryways welcoming and tidy.
15. Colorful Baskets for Easy Organization

Bring a burst of color and organization to any room with decorative baskets! These versatile items can hold toys, magazines, or extra blankets while keeping your space looking stylish. Available in various sizes, materials, and patterns, you can easily find options that fit your decor style.
Place baskets on shelves, in closets, or even as standalone decor pieces. Not only do they help maintain tidiness, but they also add a fun and playful vibe to your home.
To get started:
– Select colorful baskets or bins that suit your needs.
– Organize items into different baskets for easy access.
– Position them throughout your home for a cohesive look.
– Regularly update the contents to keep organization fresh.
This simple yet stylish solution enhances every corner of your home, making it inviting and well-organized!
Colorful baskets are a budget-friendly way to make diy organization ideas work in any small space. When you drop toys or magazines into a bright basket, tidying becomes quick, visual, and maybe even fun. Mix sizes and patterns to turn clutter into cohesive decor.
16. Label Everything for Easy Access

Labels are the unsung heroes of home organization! Use them to categorize and identify everything from pantry items to storage bins. Not only does this simplify finding things, but it also enhances your space’s overall aesthetic.
You can create decorative labels from cardstock, chalkboard stickers, or even print them using a label maker. By labeling items, you can maintain a tidy and efficient environment.
To label effectively:
– Choose a cohesive label style that matches your decor.
– Clearly mark each item or container with its contents.
– Regularly review and update labels as needed.
– Encourage everyone in the home to maintain the labeling system.
This small step can make a significant difference in your organization efforts while adding style to every room!
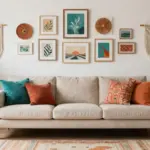
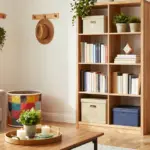
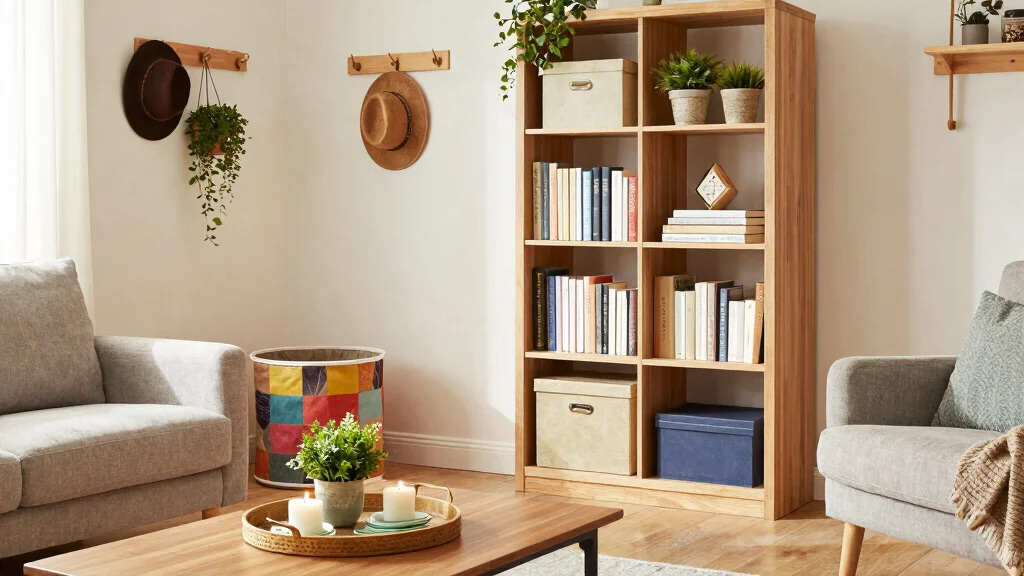
17. Utilize Vertical Space with Tall Shelves

When space is at a premium, don’t forget to look up! Tall shelving units are excellent for maximizing vertical space while providing ample storage. Use them to display books, decorative items, or unused kitchenware, keeping surfaces clutter-free.
Opt for open shelving to create a light and airy feel, or choose closed cabinets for a sleek, polished look. This way, you can house all your items while ensuring your room looks stylish and organized.
To implement:
– Measure your space to find the right tall shelf for your area.
– Organize items based on height and frequency of use.
– Showcase decorative items on top for a stylish touch.
– Regularly declutter to maintain an organized appearance.
This approach not only saves space but also makes your home feel more curated and intentional!
18. Scalloped Wall Hooks for a Fun Touch

Add a whimsical design element to your walls with scalloped wall hooks! These functional pieces can hold everything from coats to accessories while offering an artistic touch to your decor. Choose colors that complement your theme for a cohesive look, allowing them to serve as both storage and decoration.
Install these hooks at various heights for a playful aspect, especially in children’s rooms or entryways. They not only help keep items organized but also infuse personality into your space.
To create this effect:
– Select scalloped wall hooks in colors that match your decor.
– Decide where to install based on usage.
– Hang items in an organized manner for easy access.
– Regularly rotate items for visual interest.
This charming accent personalizes your organization efforts, adding a fun flair to any room!
“Fun fact: scalloped wall hooks turn clutter into charm, boosting diy organization ideas in small spaces by up to 40%. Hang coats, bags, and kids’ accessories at playful heights, and watch your walls become stylish storage—without breaking the budget.”
Conclusion

With these 18 DIY organization ideas, you can transform your home into a stylish, clutter-free oasis without breaking the bank! Each project offers a fun and creative outlet while improving functionality in your space. Keep your home organized, reflecting your unique style and personality with these budget-friendly decor solutions. Which idea will you tackle first? Let your creativity flourish and enjoy the organized beauty of your home!
Note: We aim to provide accurate product links, but some may occasionally expire or become unavailable. If this happens, please search directly on Amazon for the product or a suitable alternative.
This post contains Amazon affiliate links, meaning we may earn a small commission if you purchase through our links, at no extra cost to you.
Frequently Asked Questions
What are some easy budget-friendly diy organization ideas for small spaces?
There are plenty of simple diy organization ideas that won’t break the bank. Start with vertical storage like pegboards, wall-mounted shelves, and stackable bins. Use repurposed items such as shoe organizers on the back of doors, fabric bins, or crate-style shelves. Label everything for quick access—this is a core home organization tips concept. Choose budget-friendly decor with neutral colors and stylish storage solutions to keep the look cohesive. With a little creativity, you can implement affordable DIY projects that actually look great and maximize space.
How can I organize a small closet without expensive systems?
Declutter first to make room for a practical diy organization ideas approach, then add budget-friendly decor like tension rods, hanging organizers, clear bins, and an over-the-door organizer. Use labeled bins to separate shoes, accessories, and seasonal items. Create zones (work outfits, casual wear, activewear) to speed up getting dressed. These home organization tips provide stylish storage solutions without breaking the bank, and they’re easy to customize with what you already own.
What materials are best for affordable DIY projects that still look stylish?
Think upcycling and smart pairing. Use wood scraps or plywood, cardboard, PVC pipes, fabric, and paint to build simple organizers and storage. Finishes matter—a quick coat of chalk paint or stain can elevate cheap materials into budget-friendly decor that feels intentional. Add removable wallpaper or contact paper to update surfaces without a big cost, turning everyday items into creative home improvement wins.
How can I maximize storage in a tiny living room on a budget?
Prioritize vertical space and multi-functional furniture. Try wall-mounted shelves, a floating desk, a storage-backed sofa or ottoman, and baskets that tuck into shelves or corners. Choose pieces with hidden compartments to keep clutter out of sight, then use cohesive baskets or boxes for a neat look. This approach delivers stylish storage solutions and practical home organization tips without overspending.
Are there quick DIY organization ideas I can finish in a weekend?
Absolutely. Start with a pegboard wall for a busy entryway or craft corner, then add mason jar organizers for pantry staples, and crate shelves for books or toys. A simple under-bed storage setup with fabric boxes can free up a surprising amount of space. Label everything so order sticks long after the weekend is over—these affordable DIY projects deliver fast results and pair well with budget-friendly decor and creative home improvement ideas.